Kitchen And Bathroom Renovation : Replace a Tub Spout 02
TO REMOVE A THREADED SPOUT
• By hand, and with enough force, unscrew the entire spout counterclockwise. If there is a bead of caulking around the spout making it difficult to unscrew, break the seal with a utility knife.
You may need to use tongue-and-groove pliers if it’s hard to budge.
• Clean off any Teflon tape or sealant from the threads with a scouring pad, and remove any caulking
from the tile with a scraper.
THE PROJECT: Slip spout
1. Clean off any old residue on the tile with a razor scraper.
2. Slip it over the nipple and tighten the set-screw.
3. Apply a small bead of silicone caulking around the back end of the spout to create a watertight seal around the wall.
THE PROJECT: Threaded spout
1. Wrap new Teflon tape clockwise around the threads of the nipple, three tight spins.
2. Screw on the new spout.
3. Apply a small bead of silicone caulking around the back end of the spout to create a watertight seal around the wall.
Monday, December 19, 2011
Sunday, December 18, 2011
Replace a Tub Spout 01
Kitchen And Bathroom Renovation : Replace a Tub Spout 01
Replacing a tub spout becomes more than an aesthetic update when the diverter stops working properly. It’s no fun when you flip the tub spout to shower mode, but more water seeps out of the tub spout than comes out of the showerhead. That’s fine if you have a fetish for exceedingly clean feet, but for trying to wash shampoo out of your hair? Not so much.
CONSIDER THIS
Getting the proper tub spout replacement is crucial, so be sure to bring the old one with you to the plumbing parts store.
PREP WORK
You’ll fi rst need to identify whether your spout is a threaded or a slip type. A slip-type spout slips over the pipe that comes from the wall (called a nipple) and is fastened to the nipple with a set-screw. A threaded-type spout is threaded and screws onto the nipple that protrudes from the wall.
WHAT YOU’LL NEED
Tub spout with correct fi t (type, length, with
or without diverter)
Allen wrench or screwdriver (for a slip spout)
Tongue-and-groove pliers*
Utility knife*
Teflon tape (for threaded spout)
Scouring pad (for threaded spout)
Razor scraper
Silicone caulking
Caulking gun
* If applicable
TO REMOVE A SLIP SPOUT
• Look around under the spout, toward the wall for a slot from where the screw is accessible. With an Allen wrench or screwdriver, loosen the screw.
• Once the screw is loose, just slip off the spout. If a bead of caulking around the spout is making it difficult to unscrew, break the seal with a utility knife.
Replacing a tub spout becomes more than an aesthetic update when the diverter stops working properly. It’s no fun when you flip the tub spout to shower mode, but more water seeps out of the tub spout than comes out of the showerhead. That’s fine if you have a fetish for exceedingly clean feet, but for trying to wash shampoo out of your hair? Not so much.
CONSIDER THIS
Getting the proper tub spout replacement is crucial, so be sure to bring the old one with you to the plumbing parts store.
PREP WORK
You’ll fi rst need to identify whether your spout is a threaded or a slip type. A slip-type spout slips over the pipe that comes from the wall (called a nipple) and is fastened to the nipple with a set-screw. A threaded-type spout is threaded and screws onto the nipple that protrudes from the wall.
WHAT YOU’LL NEED
Tub spout with correct fi t (type, length, with
or without diverter)
Allen wrench or screwdriver (for a slip spout)
Tongue-and-groove pliers*
Utility knife*
Teflon tape (for threaded spout)
Scouring pad (for threaded spout)
Razor scraper
Silicone caulking
Caulking gun
* If applicable
TO REMOVE A SLIP SPOUT
• Look around under the spout, toward the wall for a slot from where the screw is accessible. With an Allen wrench or screwdriver, loosen the screw.
• Once the screw is loose, just slip off the spout. If a bead of caulking around the spout is making it difficult to unscrew, break the seal with a utility knife.
Add a Handheld Showerhead with a Slide Bar 02
Kitchen And Bathroom Renovation : Add a Handheld Showerhead with a Slide Bar 02
THE PROJECT
1. Determine the maximum height and right-to-left placement of the new showerhead, and then mark the wall with a pencil.
2. Using the kit’s mounting bracket, mark your drill holes at the location you have chosen.
3. Measure the bar length down from the top bracket and mark the spot for the bottom bracket—use a level to make sure it’s plumb (or a true vertical). Mark the drill holes. (The instructions may give a definitive length to drill the holes. If not, measure the distance of the assembled bar.)
4. Score the hole marks with a nail punch and hammer to create a starting point for the drill bit. (See “Drilling Tips for Tile”.)
5. Drill the holes for your mounting bracket. The kit will indicate the drill bit size.
6 Insert the anchors into the holes. Put a bead of silicone caulking around the back of the mounting brackets and screw them into the anchors.
7. Assemble the slide bar. This will usually involve attaching the shower holder to the bar and a bracket cover on to each end. Make sure that the shower holder slides properly up and down the bar.
8. Put a bead of silicone caulking around the back of each bracket cover.
9. Secure the assembled bar to the mounting brackets. Typically, there will be a set-screw on each bracket cover that will screw onto the mounting brackets with an Allen wrench or screwdriver.
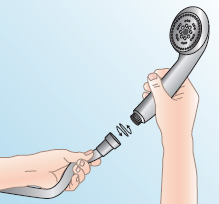
10. Screw the shower hose to the shower arm, and then the handheld shower to the hose. Many kits call for hand-tightening.
11. Turn on the water to check for leaks.
12. Place your new handheld shower on the bar and admire your work. Allow the silicone to dry before using the shower.
THE PROJECT
1. Determine the maximum height and right-to-left placement of the new showerhead, and then mark the wall with a pencil.
2. Using the kit’s mounting bracket, mark your drill holes at the location you have chosen.
3. Measure the bar length down from the top bracket and mark the spot for the bottom bracket—use a level to make sure it’s plumb (or a true vertical). Mark the drill holes. (The instructions may give a definitive length to drill the holes. If not, measure the distance of the assembled bar.)
4. Score the hole marks with a nail punch and hammer to create a starting point for the drill bit. (See “Drilling Tips for Tile”.)
5. Drill the holes for your mounting bracket. The kit will indicate the drill bit size.
6 Insert the anchors into the holes. Put a bead of silicone caulking around the back of the mounting brackets and screw them into the anchors.
7. Assemble the slide bar. This will usually involve attaching the shower holder to the bar and a bracket cover on to each end. Make sure that the shower holder slides properly up and down the bar.
8. Put a bead of silicone caulking around the back of each bracket cover.
9. Secure the assembled bar to the mounting brackets. Typically, there will be a set-screw on each bracket cover that will screw onto the mounting brackets with an Allen wrench or screwdriver.
10. Screw the shower hose to the shower arm, and then the handheld shower to the hose. Many kits call for hand-tightening.
11. Turn on the water to check for leaks.
12. Place your new handheld shower on the bar and admire your work. Allow the silicone to dry before using the shower.
Saturday, December 17, 2011
Add a Handheld Showerhead with a Slide Bar 01
Kitchen And Bathroom Renovation : Add a Handheld Showerhead with a Slide Bar 01
The convenience of a height-adjustable showerhead provides a custom fit and shower experience for everyone. Available today are handheld shower kits that connect to your existing shower arm, so installation is simple. There are also kits that off er both a fixed showerhead and a handheld showerhead that enables you to adjust back and forth between the two using a diverter switch.
CONSIDER THIS
• Take time to consider proper slide-bar placement because installation requires drilling holes in the shower wall.
• Handheld shower kits vary. Th ese instructions below offer a typical installation. Always follow the manufacturer’s instructions and safety precautions.
• If you use a silicone caulking, follow manufacturer’s drying time before showering.
• Slide bars should not be used as a safety grab rail.
WHAT YOU’LL NEED
Handheld showerhead with slide bar kit
Tongue-and-groove pliers (a second pair of
pliers may be necessary)
Screwdriver
Nail-set (or nail punch) and hammer
Allen wrench (hex key)
Drill/driver
Masonry bit (see kit instructions for size)
Scouring pad
Tefl on tape
Anchors and screws (should be included
in kit)
Silicone caulking
Caulking gun
Penetrating oil*
* If applicable
PREP WORK
• Before removing the old showerhead, wrap the plier jaws with masking tape to prevent marring the fixture finish.
• Holding back the shower arm with your hand (or second set of pliers if it’s really tight), use your tongue-and-groove pliers to unscrew the showerhead at the nut. Unscrew it counterclockwise. Use penetrating oil if the showerhead won’t budge.
• Remove any old Tefl on tape or buildup that may be around the threads of the shower arm. Use a scouring pad to clean the threads.
• Wrap new Tefl on tape around the threads of the shower arm, clockwise, making two tight spins.
The convenience of a height-adjustable showerhead provides a custom fit and shower experience for everyone. Available today are handheld shower kits that connect to your existing shower arm, so installation is simple. There are also kits that off er both a fixed showerhead and a handheld showerhead that enables you to adjust back and forth between the two using a diverter switch.
CONSIDER THIS
• Take time to consider proper slide-bar placement because installation requires drilling holes in the shower wall.
• Handheld shower kits vary. Th ese instructions below offer a typical installation. Always follow the manufacturer’s instructions and safety precautions.
• If you use a silicone caulking, follow manufacturer’s drying time before showering.
• Slide bars should not be used as a safety grab rail.
WHAT YOU’LL NEED
Handheld showerhead with slide bar kit
Tongue-and-groove pliers (a second pair of
pliers may be necessary)
Screwdriver
Nail-set (or nail punch) and hammer
Allen wrench (hex key)
Drill/driver
Masonry bit (see kit instructions for size)
Scouring pad
Tefl on tape
Anchors and screws (should be included
in kit)
Silicone caulking
Caulking gun
Penetrating oil*
* If applicable
PREP WORK
• Before removing the old showerhead, wrap the plier jaws with masking tape to prevent marring the fixture finish.
• Holding back the shower arm with your hand (or second set of pliers if it’s really tight), use your tongue-and-groove pliers to unscrew the showerhead at the nut. Unscrew it counterclockwise. Use penetrating oil if the showerhead won’t budge.
• Remove any old Tefl on tape or buildup that may be around the threads of the shower arm. Use a scouring pad to clean the threads.
• Wrap new Tefl on tape around the threads of the shower arm, clockwise, making two tight spins.
Repair a Leaky Showerhead 02
Kitchen And Bathroom Renovation : Repair a Leaky Showerhead 02
THE RENOVATION PROJECT
1. With the water shut off from the shut-off valve or the water main, turn on the shower to check that the water is off.
2 Gently pry the decorative cap on the handle off with a metal nail file or flathead screwdriver.
With the screw exposed, unscrew it and pull off the handle.
3. With the handle off, there may be a sleeve, a locking nut, and/or retaining clip(s) that need to be removed. Use a wrench or pliers to remove the sleeve or nut. Use a flathead screwdriver or needle-nose pliers to remove the clip. (Faucets vary, so you may need to work through a bit of a puzzle to remove the cap, handle,
nut, clip[s] and so on, so be patient!)
4. Pull out the cartridge using pliers, but first look to see if there’s a mark, fl at side, or notch, and mentally note its orientation. Pulling out the cartridge may take some patience—wiggle it out little by little.
5. If the cartridge won’t budge, consider using a cartridge puller, which can be purchased at a plumbing supply store (see the sidebar “Using a Cartridge Puller” below).
6. Bring the old cartridge to the store with you for the proper replacement part. Remember to note the brand of faucet. If you have a choice of brass or plastic, opt for brass—although more expensive, it lasts much longer.
7. To insert the new cartridge fi rst recall a mark, fl at side, or notch to indicate orientation. Push the new cartridge in place with your finger. The manufacturer may recommend plumber’s grease.
8. Reassemble the unit—insert the retaining clip(s) locking nut, and so on (if applicable). Then reattach the handle.
9. Turn on the water from the shut-off valve or water main and test the faucet. Check to see that hot and
cold water work in the proper handle position. If they’re crossed (hot comes out of cold and vice versa),
rotate the cartridge 180 degrees.
10. Replace the decorative cap. Finished!
Using a Cartridge Puller
When a cartridge just won’t budge, which is very common with older shower faucets and in areas with hard water, you may need the assistance of a cartridge puller. Pullers vary according to faucet brand, so each one is set-up a little differently. Be sure to find one that is compatible with your faucet type.
To use the puller, you insert it into or over the cartridge by pushing or screwing the puller in place. (Typically, there is a threaded screw on the puller that screws into the old valve cartridge stem.) After the puller is engaged with the old cartridge, twist the puller slightly clockwise and counterclockwise, and then pull the
cartridge straight out. This will break loose any mineral buildup and set that cartridge free.
THE RENOVATION PROJECT
1. With the water shut off from the shut-off valve or the water main, turn on the shower to check that the water is off.
2 Gently pry the decorative cap on the handle off with a metal nail file or flathead screwdriver.
With the screw exposed, unscrew it and pull off the handle.
3. With the handle off, there may be a sleeve, a locking nut, and/or retaining clip(s) that need to be removed. Use a wrench or pliers to remove the sleeve or nut. Use a flathead screwdriver or needle-nose pliers to remove the clip. (Faucets vary, so you may need to work through a bit of a puzzle to remove the cap, handle,
nut, clip[s] and so on, so be patient!)
4. Pull out the cartridge using pliers, but first look to see if there’s a mark, fl at side, or notch, and mentally note its orientation. Pulling out the cartridge may take some patience—wiggle it out little by little.
5. If the cartridge won’t budge, consider using a cartridge puller, which can be purchased at a plumbing supply store (see the sidebar “Using a Cartridge Puller” below).
6. Bring the old cartridge to the store with you for the proper replacement part. Remember to note the brand of faucet. If you have a choice of brass or plastic, opt for brass—although more expensive, it lasts much longer.
7. To insert the new cartridge fi rst recall a mark, fl at side, or notch to indicate orientation. Push the new cartridge in place with your finger. The manufacturer may recommend plumber’s grease.
8. Reassemble the unit—insert the retaining clip(s) locking nut, and so on (if applicable). Then reattach the handle.
9. Turn on the water from the shut-off valve or water main and test the faucet. Check to see that hot and
cold water work in the proper handle position. If they’re crossed (hot comes out of cold and vice versa),
rotate the cartridge 180 degrees.
10. Replace the decorative cap. Finished!
Using a Cartridge Puller
When a cartridge just won’t budge, which is very common with older shower faucets and in areas with hard water, you may need the assistance of a cartridge puller. Pullers vary according to faucet brand, so each one is set-up a little differently. Be sure to find one that is compatible with your faucet type.
To use the puller, you insert it into or over the cartridge by pushing or screwing the puller in place. (Typically, there is a threaded screw on the puller that screws into the old valve cartridge stem.) After the puller is engaged with the old cartridge, twist the puller slightly clockwise and counterclockwise, and then pull the
cartridge straight out. This will break loose any mineral buildup and set that cartridge free.
Friday, December 16, 2011
Repair a Leaky Showerhead 01
Kitchen And Bathroom Renovation : Repair a Leaky Showerhead 01
If your shower is leaking from the showerhead when the water is completely shut off , you probably
have a leaky cartridge or valve. Like a leaky faucet, a shower faucet repair works the same way. You need to first identify what type of shower faucet you have. Is it a cartridge, compression, or ball type? (See “Repair a Leaky Faucet".) The steps to repair a regular faucet can be used to repair a shower faucet with a few minor variations that you’ll be able to fi gure out with a little hands-on inspection. This project addresses a typical cartridge-type shower faucet.
CONSIDER THIS
To replace your faucet cartridge, you’ll have to shut the water off to your shower from a shut-off valve to your bathroom or at the water main to the house. Before attempting this project, verify that your showerhead
isn’t a bit clogged—if that’s the case, water will build-up in the nozzle and slowly drip out when the water is shut off , mimicking a leak. (See “Clean a Showerhead”.) If you cannot identify your shower’s faucet brand and model, the best way to fi nd a replacement is to bring the old cartridge with you to the hardware or plumbing supply store.
PREP WORK
• Shut off the water to the faucet from the shut-off valves or at the water main.
• Place a rag over the shower drain so that nothing falls down it.
WHAT YOU’LL NEED
Replacement cartridge
Flathead and Phillips screwdrivers
Needle-nose pliers
Tongue-and-groove pliers
Wrench*
Metal nail file or pocket knife
Cartridge puller*
Rag
Heat-resistant plumber’s grease
* If applicable
If your shower is leaking from the showerhead when the water is completely shut off , you probably
have a leaky cartridge or valve. Like a leaky faucet, a shower faucet repair works the same way. You need to first identify what type of shower faucet you have. Is it a cartridge, compression, or ball type? (See “Repair a Leaky Faucet".) The steps to repair a regular faucet can be used to repair a shower faucet with a few minor variations that you’ll be able to fi gure out with a little hands-on inspection. This project addresses a typical cartridge-type shower faucet.
CONSIDER THIS
To replace your faucet cartridge, you’ll have to shut the water off to your shower from a shut-off valve to your bathroom or at the water main to the house. Before attempting this project, verify that your showerhead
isn’t a bit clogged—if that’s the case, water will build-up in the nozzle and slowly drip out when the water is shut off , mimicking a leak. (See “Clean a Showerhead”.) If you cannot identify your shower’s faucet brand and model, the best way to fi nd a replacement is to bring the old cartridge with you to the hardware or plumbing supply store.
PREP WORK
• Shut off the water to the faucet from the shut-off valves or at the water main.
• Place a rag over the shower drain so that nothing falls down it.
WHAT YOU’LL NEED
Replacement cartridge
Flathead and Phillips screwdrivers
Needle-nose pliers
Tongue-and-groove pliers
Wrench*
Metal nail file or pocket knife
Cartridge puller*
Rag
Heat-resistant plumber’s grease
* If applicable
How to Install a Tile Backsplash 04
Kitchen And Bathroom Renovation : How to Install a Tile Backsplash 04
When the tiles are in place, make sure they are flat and firmly embedded by laying a beating block against the
tile and rapping it lightly with a mallet. Remove the spacers. Allow the mastic to dry for at least 24 hours, or as directed by the manufacturer.
Mix the grout and apply it with a rubber grout float. Spread it over the tiles, keeping the float at a low 30° angle, pressing the grout deep into the joints. Note: For grout joints 1⁄8” and smaller, be sure to use a non-sanded grout.
Wipe off excess grout, holding the float at a right angle to the tile, working diagonally so as not to remove grout from the joints. Clean any remaining grout from the tiles with a damp sponge, working in a circular motion. Rinse the sponge thoroughly and often.
Clean excess grout with a damp sponge. When the grout has dried to a haze, buff the tile clean with a soft cloth. Apply a bead of caulk between the countertop and the tiles.
When the tiles are in place, make sure they are flat and firmly embedded by laying a beating block against the
tile and rapping it lightly with a mallet. Remove the spacers. Allow the mastic to dry for at least 24 hours, or as directed by the manufacturer.
Mix the grout and apply it with a rubber grout float. Spread it over the tiles, keeping the float at a low 30° angle, pressing the grout deep into the joints. Note: For grout joints 1⁄8” and smaller, be sure to use a non-sanded grout.
Wipe off excess grout, holding the float at a right angle to the tile, working diagonally so as not to remove grout from the joints. Clean any remaining grout from the tiles with a damp sponge, working in a circular motion. Rinse the sponge thoroughly and often.
Clean excess grout with a damp sponge. When the grout has dried to a haze, buff the tile clean with a soft cloth. Apply a bead of caulk between the countertop and the tiles.
Subscribe to:
Posts (Atom)